


What Makes up a Progressive Die?
January 30, 2019
Top Factors to Consider
We continued our recent conversation about progressive stamping dies with Dave Holzer, a Journeyman Tool and Die Maker and the Sales and Marketing Manager at Wisconsin Metal Parts. The company has created a series of educational videos to teach the basics of stamping to those new to the field. In this Q&A session, we asked Dave a few questions about the estimating process and components used to make a progressive die.
Q: Dave, thanks for talking with us again. When you’re putting together a cost estimate for a progressive die, what do you need to know from a potential customer?
Dave Holzer: Putting together a bid for tooling involves a few pieces of information. First, we look at the part the customer wants to make. We review the types of materials the tool will run, the tolerances the customer expects, the volume the tool will produce, and the life expectancy of the project. We also talk with the customer about the budget available for the die.
Q: Let’s say we want to make a part with mid-range volumes, and we have a moderate budget. Can you give us an example of a solution Wisconsin Metal Parts would recommend?
Dave Holzer: Sure. If you’re looking for an economical tool for lower volumes, we may use single piece die blocks without any inserted cutting areas. We start with hardened tool steels. We build in stock guides, cutting stations, forming and piercing stations – all the elements needed to produce a complete part with a progressive die. We showcase an example in our most recent video.
Q. How do you select what materials to use when building tooling?
Dave Holzer: Tool steels are selected based on the types of materials the die will be cutting & forming and also the volume of parts the tool is expected to run. Some lower end tools might have A-2 cutting or forming steels if the volumes are low and the material is soft. Higher volumes or tougher materials will require better tool steels such as D-2, M-2, CPM or even carbide. Our tooling designers have years of experience picking the correct die steels to meet the demands of the tool.
Q. What types of equipment do you use to make the die components?
Dave Holzer: Most of the components these days are run through machines with CNC controls for milling and drilling operations. After components are heat treated, we normally will be using surface grinders to finish critical surfaces and the majority of form and cutting contours are completed in our Wire EDM machines. Once the tool is assembled, we still have tool makers who need to ensure everything is timed properly in the die and all of the cutting clearances are lining up properly.
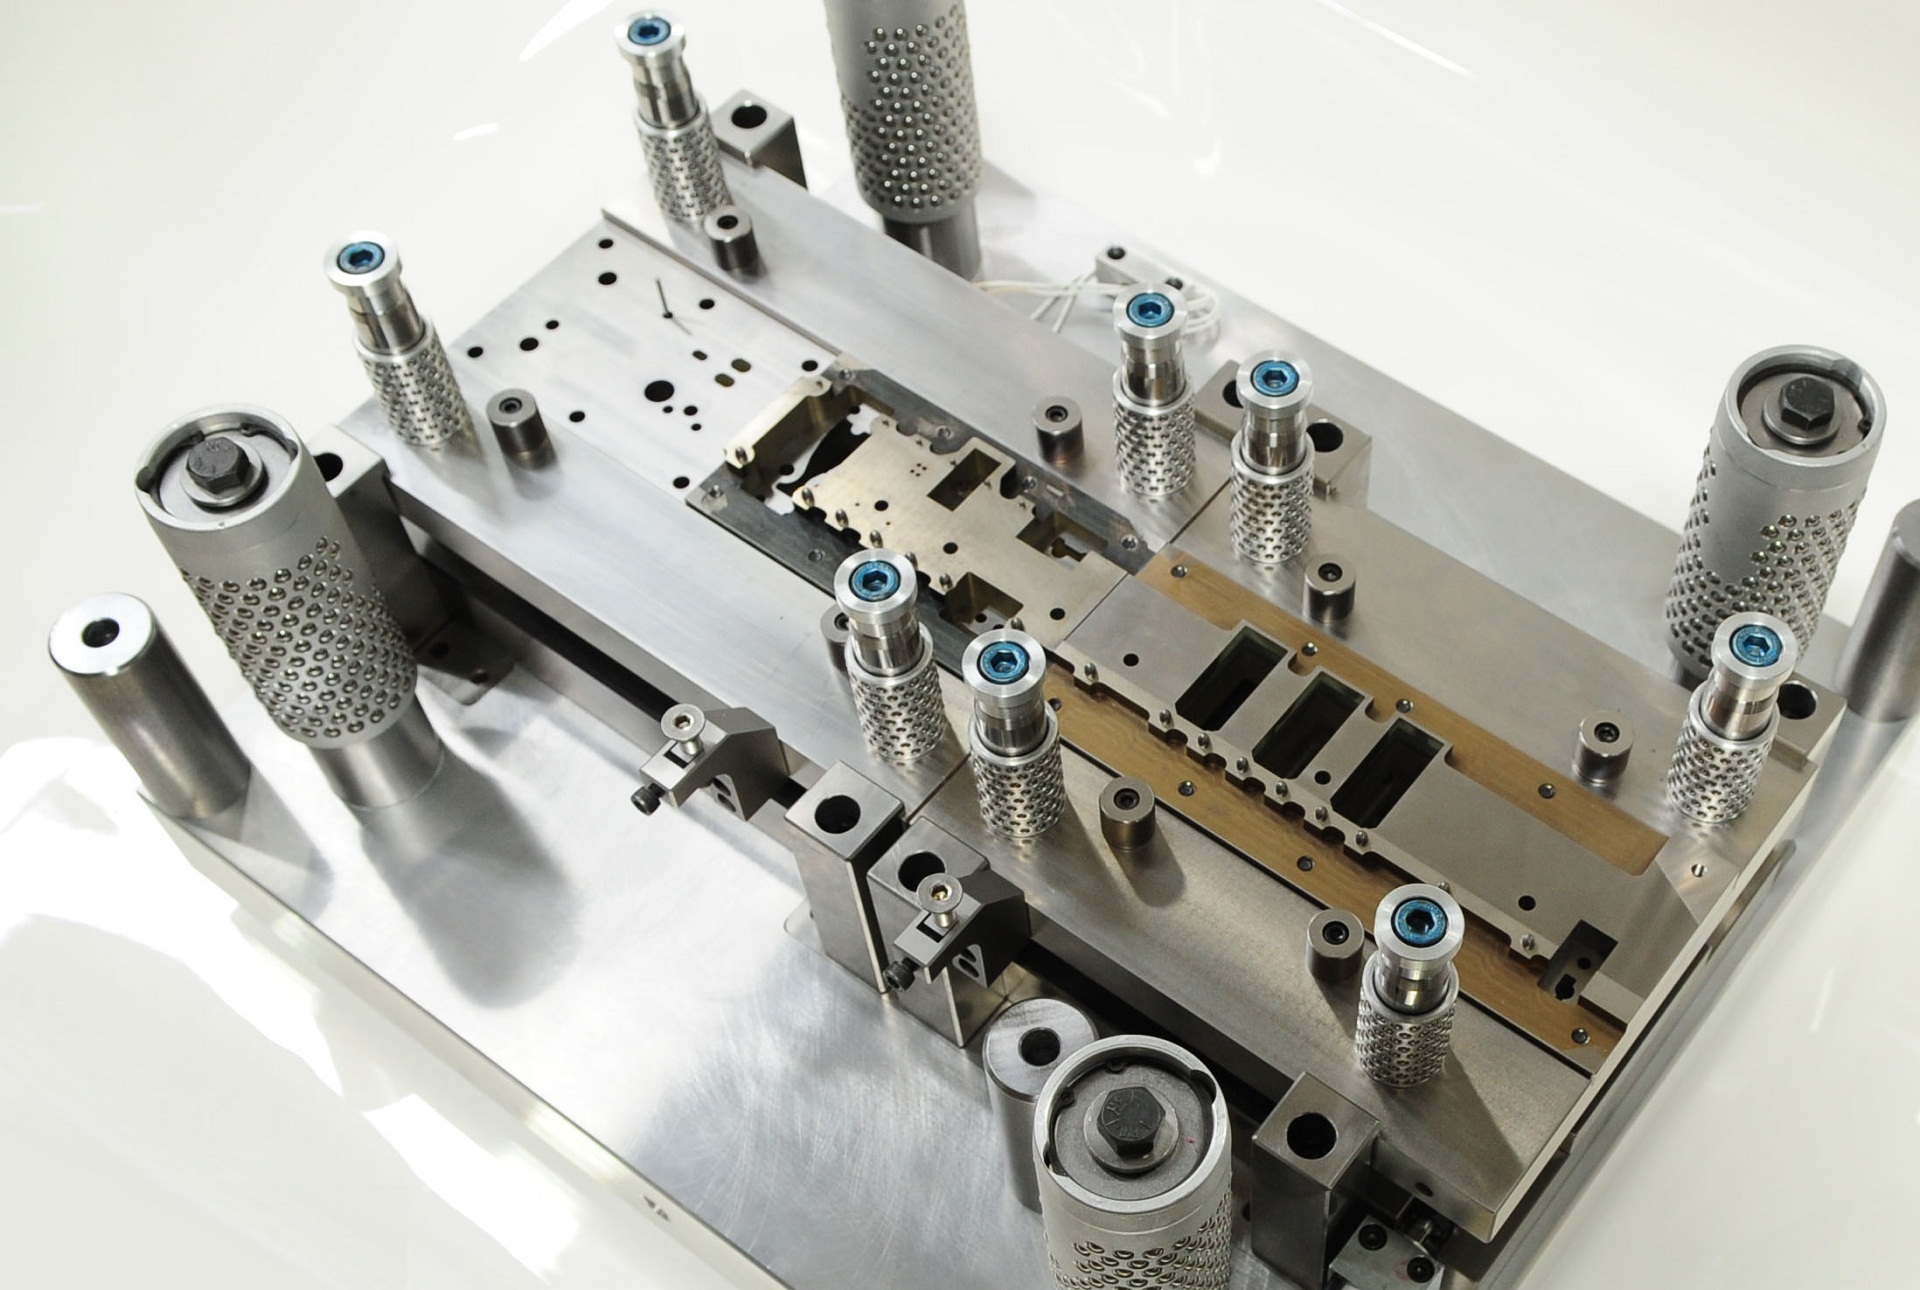
Q: We reviewed that video and noticed roller bearings on one of the dies. What do those do in the tool?
Dave Holzer: Roller cages are used to accurately locate the upper and lower die shoe. The die shoe’s (or die set) job is to repetitively open and close with the press and keep all of the die components located and in alignment.
Q: You mention a stripper plate. What does that do?
Dave Holzer: A stripper plate can perform many different functions but typically has two important jobs. First, it clamps the material against the die block and holds it steady when the press closes and operations are being performed. Second, the stripper plate allows the punches to extract themselves from the material, letting the stock strip stay in the bottom of the die.
Q: What would happen if the tool didn’t have a stripper plate?
Dave Holzer: If we didn’t have the stripper plate, there’s a very high probability that your material would stick to the punches and would pull up. The tool would shut down; you'd ruin your stock strip, produce bad parts and damage the tool. Many of these tools run minimally attended and at high speeds so we do not want those types of surprises to happen.
Q: We've talked about stock guides, cutting stations, forming, pierce holes, piercing stations and stripper plates. Are there any other vital components of a progressive die?
Dave Holzer: A progressive die also has stop blocks or die stops. Stop blocks are used to time the die in the press and set where the press stops it stroke. Stop blocks are made to a precision height and have a ground slot .050” deep. During setup, a technician places a piece of solder in the slot. When the press is cycled the solder is crushed and then measured with a micrometer. If we are reading more than .050” thick we'll adjust the press down more to ensure the punches and forms come together to the proper depth. Stop blocks can also help us troubleshoot the tool. We may be on the stops on one side, but off them on the other end. This might tell the tool maker that part of the die or press is binding or misaligned. At that point we will investigate further.
Q: Now what if we had a more complex, higher volume part. What would be different about the tooling for this kind of project?
Dave Holzer: We show a higher-end tool in our second tooling video. The basic concept is the same as the lower volume tool but now we chose to insert the cutting and forming stations. On this tool we use a hardened A-2 die chase to locate and hold the inserts. Because of the higher volumes and materials we were cutting we also used higher end tool steel inserts.
Q: What are the benefits of inserts?
Dave Holzer: A key benefit of using inserts is ease of replacement. If an insert breaks or chips, we can replace it without rebuilding the entire block. Inserts also add cost-effective versatility to the die. If the customer makes a design change, we can replace or modify and existing insert – not replace a whole new dieblock.
Q: This tool has a flat metal plate below it. What is that called?
Dave Holzer: The block below the die chase is called the back-up plate. We need a back-up plate to protect the tool because inserts are made of hardened tool steel, and the die sets are made from soft steel. If we didn't have the back-up plate, the force of impact from the tool coming together would push the inserts into the die set.
Q. That's another crucial part of a progressive die, then. Any other unique components of a higher-end tool?
Dave Holzer: A higher end tool might have guided stripper plates. That really depends on the individual part that is being made. Our design team is trained to make those decisions and choose the most cost-effective tooling solution to meet the customer’s needs.
Q. We saw pilots on the video. What do the pilots do?
Dave Holzer: Yes, the video shows an excellent example of a pilot. The bullet-nose shape enters the pilot hole on the part strip and settles it into a final location. Every time the die comes together, we know exactly where this part is going to be in the tool. Pilots locate the strip as it progresses through the tool to ensure alignment beyond what the material feeders can hold for accuracy. Without pilots we might not have holes, edges and forms in the proper location to meet the part print because each of these operations is happening in a different station in the tool.
Q. What is a “heel”?
Dave Holzer: Sometimes we have cutting or forming happening on only one side of a punch or form. The forces from this operation could cause the punch to flex during operation. This could prematurely wear components or cause them to break. A heel is an extension designed in to the punch that enters into the die block before the operation happens and provides extra support to counteract those side forces.
Q. Wow! These progressive dies are very versatile.
Dave Holzer: Yes, you’re right. Every tool makes a specific part. Some dies can have interchangeable inserts to create a series of parts. Our goal is to deliver a strong return on customers' investment. We focus on providing quality, well-built tools that provide consistent quality and low maintenance costs.
Wisconsin Metal Parts designs, builds and runs metal stamping dies. Find out more about our services here. If you’d like to discuss a specific part, contact our team and upload your drawings. We will work with you to deliver the best solution for your needs.
Watch our two part series about what makes up a progressive die below for more information.
Get in touch
- Fabrication:
- 404 Pilot Ct
- Waukesha WI 53188
- Stamping & Machining:
- N4W22450 Bluemound Rd
- Waukesha WI 53186
- Phone No.: (262) 524-9100
-
